
With glass tile becoming more popular the use of it in bathrooms, pools and on back splashes I have seen quite an increase of installations over the years here in Tampa, Florida. Glass tile is pretty much endless in colors, sizes and shapes. There is a wide variety of glass tile finishes to choose from like glossy, iridescent, etched, metallic or printed, and textures like flat, rippled, relief or dimpled. Also the tile sizes range from 1″, 2″, 4″, 5″, 6″, 8″ and even large sized glass tile 12×12 up to 24×24 in size. There are quite a few good glass suppliers out there selling nice glass tile like Modwalls.
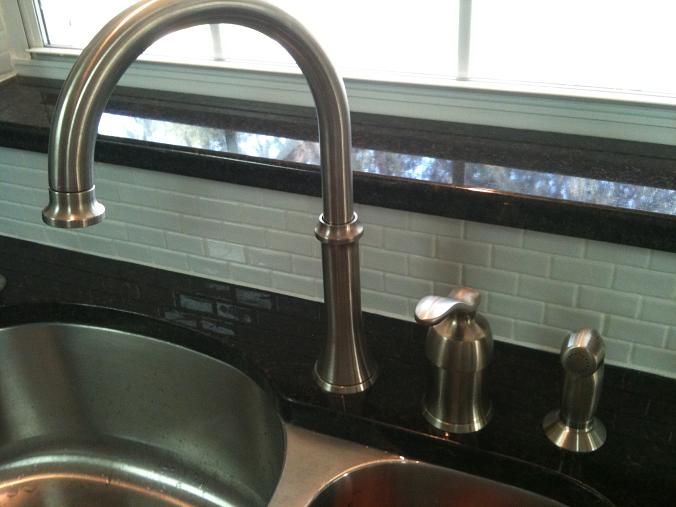
This backsplash I am going to talk about was actually purchased from Modwalls and was the 1×2 Recycled Viridian Glass Brix tile in color Cotton in a mini subway tile pattern. You could use this tile for indoor and outdoor installations, commercial and residential, wet and dry applications, walls, showers, pools, counter tops and back splashes. It’s also suitable for floors with light foot traffic. Made of 98% recycled glass, this gorgeously Green Product is as kind to the environment as it is beautiful to the eye. Eco-Friendly and sustainable surfacing product derived from reclaimed glass building windows and manufacturing pieces from windows and windshields. Besides looking great you will also feel good about using this recycled glass tile in whatever area you tile.
This install went great and the final product came out even better. The homeowner first ripped out the old cabinets and counter top and had new white cabinets installed with a new black granite counter top. They also had new drywall installed where the back splash was and I wasn’t to pleased with how the drywall guy did it. I used mesh tape and thinset to fill the gaps between the sheets of drywall. I wanted to make sure I did the floating prep work to ensure a smooth flat glass tile install. After the mesh taping was done I measured the glass tile sheets and did my layout. It was great to see that the sheet measured 12 1/4′ high and the bottom of the cabinets to the top of the granite counter top was 18 1/2″. This would allow me to get full tile at top and bottom allowing for a grout joint at top and bottom.
I checked to make sure the granite counter top was level and it was. This gave me a good level starting point to set the glass tile and work my way up to under the cabinets. Before starting I also protected the counter top with my drop cloth and also used a drop cloth on the kitchens wood laminate flooring in case my tools, bucket or sand could scratch either of them, Being clean and careful is always good thing when doing Residential remodel construction. I started by making a level line mid way up for reference while setting the glass tile sheets. The thinset I decided to use is one of my new favorites from Laticrete called 4XLT. It’s a thin bed, medium bed and non-sag all in one thinset and I highly recommend the non-sag properties to use with glass tile so the sheets stay in place and don’t slide. It’s always best to follow the glass tile manufacturers thinset recommendations. Some clear, opaque or iridescent glass needs a pure white thinset since it might show through the glass tile. Always do a small mock up installation to test that and the grout to see if it scratches the glass tile. The small glass mini brick tile were set on the mesh backed sheets pretty straight. The tile were slightly irregular which added to the beauty of this recycled glass mosaic mini Brix subway look.
The glass tile doesn’t come with a bullnose tile so I elected to run a soldier course vertical to create a border edge. The tile is slightly rounded so this was a good way to terminate the 1/2 tiles at the back splash edges. This is also common when doing regular 3×6″ ceramic subway tile. The tile cut easily with my glass tile wet saw blade without chipping or cracking, I was able to cut the glass tile all in one shot still mounted on the sheet since the mesh backing was strong and held together even when wet. I used a 1/8″ notched trowel to set the glass tile and I also flat troweled the drywall substrate to burn/key in a thin layer of thinset and get a good bond. When setting the sheet I use my rubber grout float to lightly tap the glass tile into the thinset to ensure they are embedded in the thinset. Once the glass tile was all set I caulked the corners and the change of plane with a matching Laticrete sanded premium acrylic caulk. I let the thinset cure for 24 hours and then grouted it with Laticrete’s 1500 sanded grout in color #44 Bright White sanded grout.
I picked up my drop clothes, cleaned my tools, final washed the glass tile, cleaned the counter top and turned over the new glass tile back splash to the owner.
You should have seen how happy they were ! 


If your looking to install glass tile in Tampa, Florida
Feel free to Contact Us for a Free Estimate
12 responses to “Recycled Glass Tile Backsplash Installation”
hi, great blog on recycled glass tile !
Looks really sharp Brian, nice work as usual.
thanks, I appreciate the compliments.
Thanks so much for sending this link, Brian! You do beautiful work and we are excited to share your installation tips with our customers! Best, Sarah @ modwalls.com
As the homeowners for this recycled glass tile backsplash project, we are extremely pleased with both the Modwalls tile and (Ceramictec) Brian’s artistry in installing it. We realized just how important it was to have an installer experienced with glass tile after talking with a couple of other local installers who had never worked with glass. Just talking to Brian on the phone, we felt comfortable that he was a professional and had no more worries that it would turn out well. We appreciated the efforts he took to protect our newly remodeled kitchen while he worked and the attention to detail in the placement of the tiles that made the entire job have that polished look. He really cares about making sure the job is done well and it definitely shows. We’ve received so many nice comments on our new backsplash and couldn’t be happier. I can’t wait to start remodeling the bathrooms next!
Beautiful tile and great installation! I like the fact that it is recycled glass but it is less opaque than normal glass. Makes it look like white ceramic but it seems to have a slight shimmer that is unique. Really cool!
Kathy
http://www.stoneimpressions.com/
nice post.
I’m typically not a fan of white tile or marble but this turned out really nice and gave the kitchen a bright blissful feeling. Nice work =)
That looks great, are they recycled glass bottles ?
I Tweeted this…. good article !!! Asti
lots of useful information here. I’m sending this to some friends!
It looks really sharp , no pun intended with it being glass 😉